-
 Danbury, CTWednesday, Dec 2nd, 2020"From the crew that put the roof on in 1 day, to the crew..."
 -
Redding Center, CTThursday, Jul 30th, 2020"I wish I had more roof's to hire these guys to replace! Had..."
-
Westport, CTThursday, Dec 3rd, 2020"I had a very positive experience with Brown Roofing, prior..."


Click the icons to see what our customers had to say.
Fairfield County, CTTrusted Roofer & Gutter Installation Contractor
Expert Roof Repairs, Roof Replacements & Seamless Gutters in Fairfield County, CT
In business since 1972, Brown Roofing Company, Inc. is a family-owned and operated roofer and covered gutter installation company dedicated to your safety and well-being. We specialize in roof repair, roof replacement, seamless gutters, gutter guards, siding installations, skylights, and more that will add value and security to your home. Our fully trained and certified technicians can help with all of your gutter and roofing issues, no matter how big or small, including roof leaks, broken shingles, wood rot, clogged gutters, and damaged siding.
We also offer emergency roofing services, so we can be there when you need us most. If you're looking to restore your roof or for better gutter protection to create a safer, stronger home, you've come to the right place!
Our Services in Fairfield County:
- Roof Repair & Roof Replacement
- Emergency Roof Repair
- Ridge Vents & Roof Ventilation
- Wood Rot Repair
- Hail Damage Repair
- Roof Inspection
- Covered Gutter Installation
- Gutter Guards & Leaf Covers
- Siding Installation
We offer free estimates for all of our services in and around Fairfield County, CT, including roof repairs, roof replacements, gutter installations, gutter guards, siding installations, and more – schedule yours today!
Lasting Roof Repairs in Fairfield County, CT
If your home has roof leaks, wood rot, missing or broken shingles, or other roofing issues, you should contact a professional roofer as soon as possible. Roofing problems can get worse, calling for costlier repairs. Damage can even spread and cause problems to the rest of the home, such as water intrusion, poor energy efficiency, pest infestations, mold, and more.
By scheduling a roof inspection with Brown Roofing Company, Inc., our roofers will examine all levels of the system to ensure the structural integrity is intact and to diagnose the roof's unique issues. After, we recommend the perfect repair plan that addresses just what you need, not any more or less. We also provide emergency roof repair services, ensuring a quick and effective response when a disaster strikes your home!
Schedule a roof inspection and free roof repair estimate in Fairfield County, CT today!
Durable & Beautiful Roof Replacements
While roof repairs can be the most cost-effective option in some cases, this isn't true for roofs that sustained serious damage, roofs that reached the end of their lifespan, or roofs that are beyond the point of restoration. Repairing roofs in these cases will mean the damage is likely to reoccur and worsen. Ultimately, this will cost you more to have to repair it again and again.
But one call to Brown Roofing Company, Inc. for a total roof replacement means transforming your home's exterior and strengthening your roofing system at every level. This ensures results that last and better protect the property from the elements! Roof replacements are generally a large undertaking, which makes the project stressful. However, you can rest easy knowing our professional team of roofers will work with you every step of the way. We'll help you select the proper roofing material for your home and keep you clued into how the project is proceeding. Overall, we want to leave your home better than it was before!
And if you're not sure whether you need roof repairs or a roof replacement, you can schedule a roof inspection and we can provide a thorough examination of your system. After, we'll recommend services based on your home's unique needs. Click below or call 1-475-255-7400 to get yours today.
Get A FREE Roof Replacement Quote!
Gutter Protection System: Aluminum Gutters & Gutter Leaf Guards
Not just any covered gutters will protect a home from the elements. If you have frequently leaky, clogged gutters, this can lead to water damage caused by the runoff spilling over onto the house and surrounding areas. That includes foundation damage, basement flooding, water intrusion, stained siding, and more.
That's why Brown Roofing Company, Inc. installs innovative seamless gutters, including aluminum gutters, gutter guards, downspouts, and downspout extensions. Our covered gutter protection system and leaf covers offer higher degrees of strength than traditional jointed gutters made of multiple connected pieces. They also withstand heavy flow for decades to come and offer enhanced debris resistance.
Our Gutter Installation & Gutter Leaf Protection Solutions:
- Gutter Installations
- Gutter Replacements
- Gutter Leaf Protection
- Gutter Guards & Leaf Covers
- Aluminum Gutters
- Gutter Protection System
- Downspouts
- Downspout Extensions
- Seamless Gutters
- Free Covered Gutter & Gutter Leaf Guard Estimates
Never worry about recurring leaky, clogged gutters again with the gutter protection system from Brown Roofing Company, Inc.. Our seamless gutters include gutter guards, downspouts, and downspout extensions. Call 1-475-255-7400 or click below to get a free estimate on any of our covered gutter services.


We consider ourselves specialists in Condo Roofing.
Most projects are done over a number of years doing the roofs that need most attention first. We also have handled many condos that needed snow removed from roofs in heavy snow fall times.

You must put the ice and water shield up to code for the manufacture in town building officials so you must know your building codes when installing ice and water shield this is very important you also want to install it on there all flashings around chimneys vent pipes and any other openings in your roofing system
removed a old set off gutters and found a lot of damaged wood so we had to sister boards to the existing rafters so we had a better nailer and installed all new facia boards

There are a wide variety of gutter types to choose from at Brown Roofing, but copper gutters and downspouts were the right call for this Ridgefield home. They add a perfect touch to the wood siding and Owens Corning shingles. Besides it's durability, one of the most unique features of copper siding is that it will change color throughout its lifetime. The gloss will doll down in the beginning, turning brown. and will eventually patina into a beautiful green.

We received a call from a Stratford home owner because she was concerned about the condition of her roof after the wind storms. From the ground, the roof looked fine but that's why we do inspections. Once up on the ladder, we noticed a tremendous amount of damage from ice damming as well as multiple missing shingles from the heavy and consistent wind gusts. If you notice water coming into your house from the attic, or you are concerned after a big storm, give Brown Roofing a call.

removal of shingles and plywood and installed gaf lifetime supply shingles

placing metal roof onto this beautiful house. Roof looks amazing

Roof Replacement in Redding

Roof Replacement in Brookfield
Replacing this roof in Westport ct, we took 2 of the 3 skylights our and replaced the entire roof

Small shed in Shelton, CT we did a few weeks ago. He was a previous costumer of ours and he called us up to do another project for him and we go right onto it!

One of our jobs down in Newtown. We replaced this homes roof with a GAF Lifetime Shingle and also used some metal in certain sections!


We are replacing this roof in Bridgeport, CT this roof was very old and had a lot of storm damage!

Complete plywood rip on this home in Shelton Connecticut we replaced every sheet of plywood and installed a GAF lifetime Roofing system

Our Certified Roofers Replaced this roof in Monroe Ct, this roof was replaced with a GAF Lifetime Shingle
Roof Replacement Newtown Ct Replacing this roof with a GAF Lifetime Shingle

Replacing roof in shelton Ct with a Gaf Lifetime Shingle!

We are replacing the roof on this building in Weston Ct, we are replacing this roof with all new plywood and a Gaf Lifetime Shingle


Our certified roofers working on laying down some ice and water and felt paper down on this roof!
Our certified roofers setting up their day of work on this nice rubber job in Shelton Ct!

We are replacing this roof in Danbury Ct, this roof is getting replaced with a Gaf Lifetime Shingle


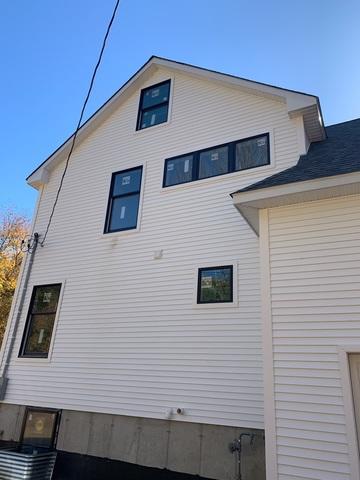
our certified roofers replacing this home with a new Roof, Metal, an Siding Replacement in Easton Ct


Our Certified Roofers working on this home in Bethel!

Replacing this roof with a Owens Corning Lifetime Shingle
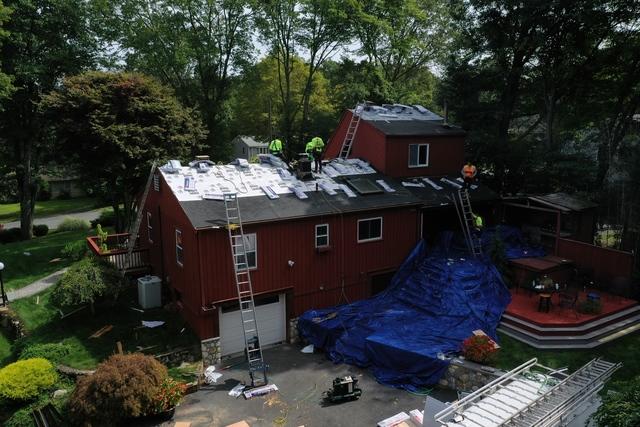
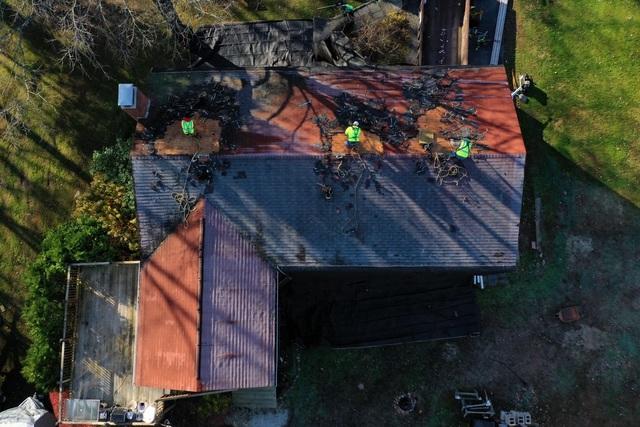
For this particular job, we assigned three specialized teams: one for roof replacement, one for gutter installation, and one for siding installation. We follow a systematic approach when handling projects where customers require multiple improvements to their homes. This ensures both safety and efficiency throughout the process.
We begin by focusing on the roof, as it exhibited damage, and significant algae growth and it is the safest to start with. We also noticed portions of the roof drooping inward, indicating potential issues with the decking layer or rafters. Once we received the green light to proceed, our team swiftly initiated the demolition phase. Demolition is typically the quickest and easiest step, and it's always exciting. To protect the house from any potential damage, we lay tarps, securely nailing them to the roof's edge. By extending the other end of the tarps outward, we create a slide for the waste material. This method ensures that the house's siding and plants beneath the roof remain in pristine condition.
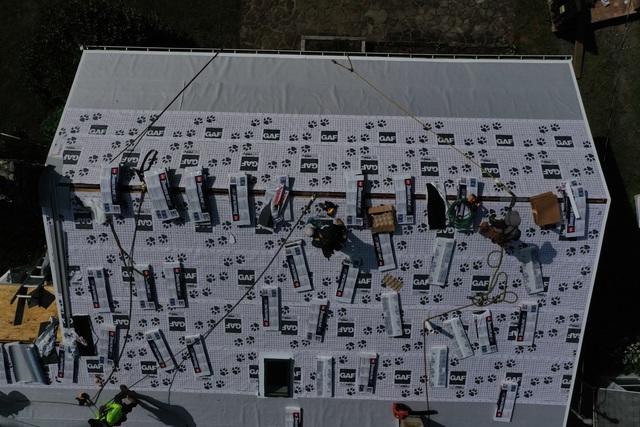
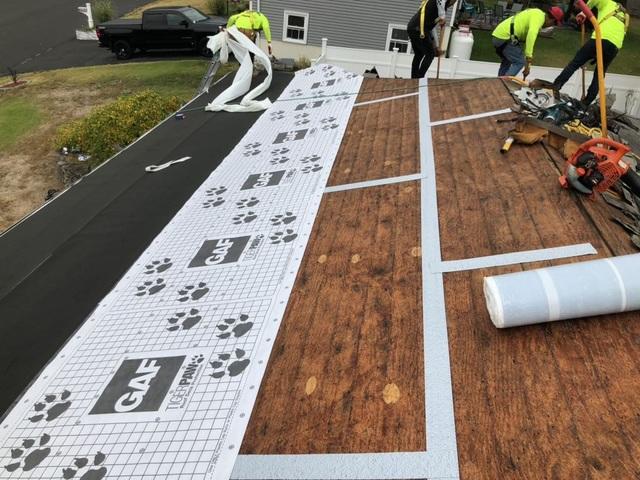
After completing the demolition, we move on to the next step, which involves analyzing the roof and identifying necessary repairs. Before commencing the work, we always dispatch someone to inspect the property. This preliminary assessment provides us with a better understanding of the project requirements, although unexpected changes can still occur. Fortunately, in this case, only the plywood decking layer was found to be rotting, and the rafters were unaffected. We proceed to remove the old layer and replace it with a new one. The subsequent stage involves installing the underlayment and Ice and Water protection. Ice and Water are applied to vulnerable areas such as edges, valleys, and eaves to prevent damage caused by ice and water. It also mitigates the risk of ice dams, which can be hazardous. The underlayment is then laid in areas not covered by Ice and Water, overlapping it to provide an extra layer of sealing for the roof.
Finally, we install the shingles and flashings. During the shingle installation process, we start from the bottom of the roof to ensure proper layering without any gaps that could allow water to leak through. As we progress upward, we incorporate flashing around roof openings, such as vents and chimneys, to ensure a watertight seal. Once all the shingles are securely in place, we finish the roof by installing ridge vents.
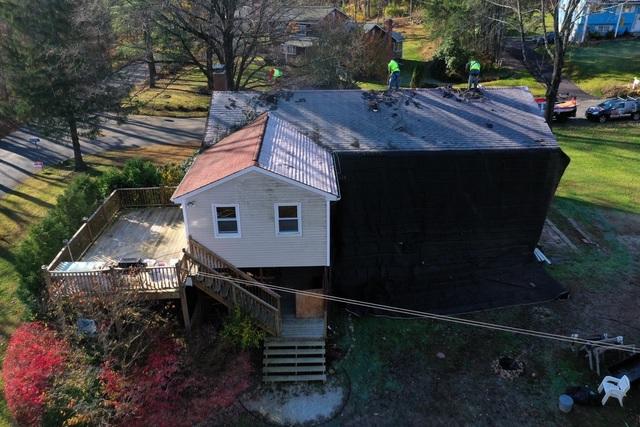
On the second day of the project, we focus on gutter installation. This task typically requires less time compared to roof and siding installation. For this specific home, we opted for our 6K gutter system, which not only enhances the property's value but also effectively redirects water away from the house, protecting it from potential damage.
Lastly, on the third day, we remove the old siding and install brand new siding. The homeowner chose our Cedar Peaks Premium Blue Siding, which beautifully complements the new roof and gutters. The transformation is truly remarkable, and within just a few days, the house undergoes a complete makeover.
By following this meticulous and organized approach, we ensure that each step of the project is executed with precision and attention to detail, resulting in a stunning and functional outcome for our valued customers.

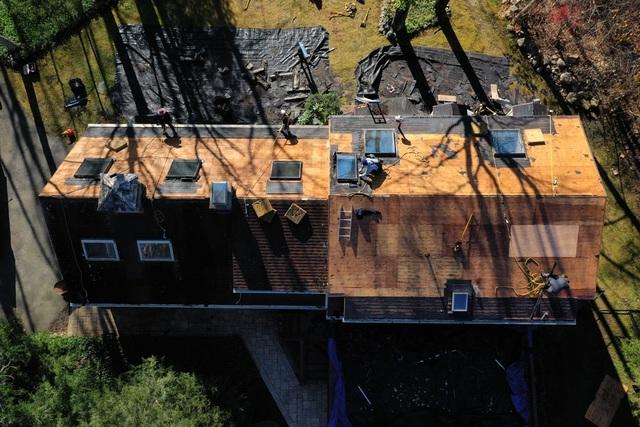
Our team did a full roof repair and replacement on this home, this home had many issues but the biggest was the roof's condition. Due to the home's location and tree coverage, there was substantial moss growth on the shingles. This moss causes all sorts of problems for the homeowners. When moss builds up on shingles it causes water to be trapped between the shingles and this water makes its way through the gaps in the shingles and this ends up causing the decking layer and rafters to rot.
Ripping up the old and damaged shingles is the first step to this roof replacement. These shingles came up quickly due to old age. Next, we gave another look at the decking layer to make sure the plywood was not rotting. As we expected most of the sheets were starting to rot and we saw some mold growth we ripped up all the rotting plywood and replaced it with brand-new sheets.
After the decking layer is repaired we can start laying down the three layers that go in between the shingles and decking layer. The first thing that goes down is the seam tape and this tape goes over all the seams created by the plywood, this tape is just another layer of protection. Next Ice and Water is laid down and this is installed on all the edges, valleys, and eaves. Finally, we lay down the final layer and this is called the underlayment. This layer covers the rest of the roof that is not covered by the Ice and Water. All of these layers act as a barrier in case the shingles are damaged from a storm or other outside forces, they also help insulate the roof helping to create a more energy-efficient home.
Finally, we install the shingles and this is done starting at the bottom of the roof to the top to ensure that they are layered properly. As we work up the roof we install flashings around all the vents, siding, and chimneys.
Over the span of one day, this roof was completed from start to finish. This homeowner can be confident knowing that their roof is guaranteed to keep them safe and dry for the next 50 years.

This family reached out to us due to their leaky roof. After the appointment was made and the date rolled around Mat Bey went out to this customer to inspect the roof and come up with a game plan with the homeowner.
After walking around the property with the customer and inspecting the roof, Mat came up with a quote and timeline for the job. After reviewing with the homeowner and deciding on a price, our production team got the green light to start the demo.
The first step in the roof replacement process is ripping up the old shingles and taking another in-depth look at the decking layer below and that's just what we did. When ripping up the old shingles it's imperative to be alert and aware of your surroundings. It’s important for our guys to know what things could be damaged or broken near the work site. In these cases, we take precautions like leaning two sheets of plywood against each other to make a shelter for bushes and plants. We also always staple a tarp to the edge of the roof and place the other end on the ground making a slide for the old materials ensuring nothing ends up in the lawn.
Now that the old shingles were off the roof our project manager inspected the roof and came to the conclusion that many of the sheets needed to be replaced due to mold and rot. This roof had very few damages that stood out from afar but close up there were many holes that allowed for water to seep through causing this mold and rot. We ripped up the old plywood and replaced them with brand-new sheets.
The next step in this process is to lay down Sealeron Ice and Water, a synthetic underlayment, and decking tape. The decking tape is put down on all the seams created by the plywood. The Ice and Water are laid down on all the eaves, rake edges, overhangs, and valleys. The standard required by code is to lay down only two feet of material but we install six feet to ensure proper coverage. Now for all the remaining areas that are not covered by the Ice and Water, we install the underlayment. These three layers offer an extra barrier to stop water and anything else that tries to enter your home.
Finally, it is time to install the shingles! For shingles we always start at the highest level roof but at the bottom edge and work our way up. As we work up we strategically layer the shingles to ensure the water runs off as efficiently as possible. Also, we install flashings around any vents, chimneys, and any other openings in the roof.
With this brand new roof, this homeowner can be certain that there will be no more water leaking through the roof for many many years to come and can feel even more confident knowing that their new roof is under warranty for 50 years.

This customer contacted us explaining that they had a leak in their roof and that there were water spots on their ceiling. Immediately we set up an appointment on a day that worked for the customer and once that day rolled around our representative Geoffrey met with the homeowner.
During this meeting, he walked around the property inspecting the roof as well as the home. He also got on the roof and inside the attic to get a closer look. After the inspection process, he sat with the customer to walk them through the process along with putting together a quote.
Once an agreement was made we moved on to phase two which was getting a new roof on this home. Our Project Manager for this job was Carlos, and together with his team, they were able to finish the whole roof in just one day.
The first step was to rip up the old shingles and take a better look at the decking layer below. This roof had had two lawyers of shingles which is an outdated practice used to save money, but today it's usually frowned upon. Once the shingles were up we moved on to the decking layer and this is where we discovered the problem. Due to the double layer, there were gaps throughout the roof and these gaps were letting in water. This water is then absorbed into the decking layer rotting it and causing mold to grow. Once the plywood was fully soaked, mold water would travel through into the home.
Step two. We quickly ripped up the old decking layer and disposed of the mold. Once this was up we installed a new plywood decking layer. For this layer, we used ¾ plywood which was thicker than what was previously used.
After this is done we can move on to the next step which is laying down decking tape, Sealeron Ice and Water, and a synthetic underlayment. The decking tape goes down first and this is laid on all the seams created by the plywood. Next is the Ice and Water. This is laid down on all of the eaves, rake edges, overhangs, and valleys. Finally, we installed the underlayment which covers every section not covered by the Ice and Water. These three layers act as extra protection against the elements and leaks, they also help further insulate the roof.
For Step four, the final step we installed the shingles and this customer decided on our IKO Dynasty Granite Black Shingles. When installing shingles we always start at the bottom edge and work our way up to ensure that they are layered properly and can effectively direct water off the roof. As we work our way up we install flashings on all the vents, chimneys, and skylights.
By the end of the day, this homeowner had a beautiful new roof that will keep them safe and dry for a lifetime and they can have peace of mind knowing that their roof is under warranty for 50 years.

This New Fairfield homeowner called in for us to investigate the water leaking into his son's bedroom. Upon inspection we discovered the cause of the leak and provided an estimate for a repair as well as a replacement. Our homeowner knew that if there was one leak there could be more and opted to replace the entire room. Easy financing with monthly payments made the decision that much easier.


Our homeowner in Stratford purchased this home a little over a year ago. The home inspection claimed the roof was fine. After experiencing a leaking skylight, our inspection, Mat not only revealed the problem but also exposed rotted and moldy decking. Lot's of it. The homeowner agreed to replace the entire roof.
Our crew, under the direction of Project Manager Bill, tore off the roof, replaced and sealed the decking, wrapped it in ice & water shield and replaced the shingles with IKO Dynasty shingles with ArmourZone in Atlantic Blue. Now our homeowner is "Roof Worry Free" with the Brown Roofing 50 Year Warranty!


Contractor ID: 0549011
![]()
Brown Roofing Company, Inc., 12 Progress Ave., Seymour, CT 06483